


When we were told that we had to do a mini project in VRML for this course, I wanted to do something that could be used. I don't like doing projects that are just there and have no purpose, or only have a purpose for a few people. So, I started to think about making some sort of game.
I have seen a few games made in VRML, some were flying games and some where role playing games (RPG's). After thinking about what I could do, I decided to keep it simple. When I mean simple I mean, something that everyone could play and with out the need of any instructions for them to read. Therefor I decided to make an Air Hockey game that you find in the amusement arcades on holiday.
The design of air hockey game is quite simple. There is a playing field a puck and a playing paddle. For the moment I only made the game one player, this is due the lack of multiple user capability of COSMO.
The creation of the playing field is made up of, boxes and line sets. See below
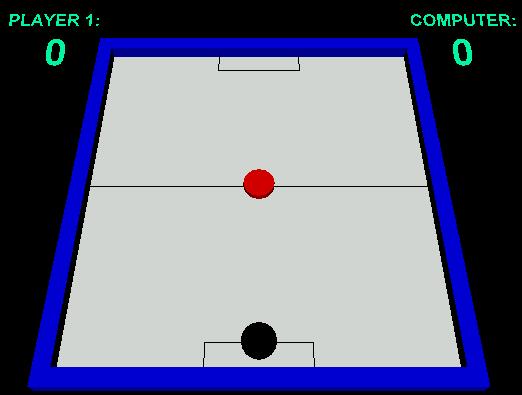
The puck in the middle is a cylinder with a height of 0.1 and a radius of 0.25, The player at the bottom of the field is also a cylinder with the same attributes.
What I wanted the game to do was when a user press the mouse on the black paddle the puck would start to move in a random direction every time you press the paddle.
The paddle has a planeSensor attached to it so the user can move the paddle from side-to-side. Due to the limitations of the planeSensor you can only move object in the x and y coordinates. I rotated the playing field on the x axis at 33 degrees therefore without redesigning the planeSensor I had to leave the way the paddle moved.
To get the objects to interact with each other I had to think about how I was going to handle collisions with the puck and the paddle and the puck with the walls. The first thing I thought of was to use a proximity sensor. BUT, they only work with the avatar and not objects in VR worlds. Therefore I had to design a javascript to handle the collisions between the objects. I will go into the javascript later on.
The title and the score text are linked to a colorInterpolator which change the color of the text constantly. I did this so the user had something to look at, and it didn't make the world look dull.
The next thing I had to do was, think about designing the way I would have to handle the object in the game. I first identified the things that I would have to move, or change on the fly they are:
1. The player 1 score
2. The computer score
3. The puck will have to move in the x and z axis
4. the paddle will have to move in the x axis
5. the scores and the main title text need to change colour
Now I have identified the object that would interact with either the user or the world its self, I went about coding this interaction.
To make the puck move I would have to change the translation of the Transform node. I decided to make the translation of both of the puck and the paddle as exposedField's so they could either be eventOuts or eventIn's. By doing this I had a bit more work to do then I would normally have to do if they were normal fields.
To access the data held in the translations I had to define another PROTOTYPE within the PROTOTYPE for the object (i.e. puck and paddle). See below:
|
PROTO GameObjects [ |
By doing the above code, I could access data in the exposedFields of the translation of the puck and the paddle. I could access and change them from within a script which would control the positioning of the objects.
Also from within the GameObject PROTOTYPE
I instantiated the scores so I could change them on the fly later.
|
... |
Like I said at the start the scores and the title text keep changing colour, to do this I needed a few VRML nodes. I had to use:
1. A TimeSensor
2. A ColorInterpolator
3. and a few ROUTE's
The time sensor just set a field called cycleInterval to .5 which would be the time it will take to change the colour of the text. And also a loop field which specific the timer to loop it's self when it finishes.
|
## ---- Timer For The ColorInterpolator ---- ##
|
The ColorInterpolator is the node which holds the colours to change to text to.
| ## ---- The Interpolator For Changing the colours ---- ## ## ---- for The Text ---- ## DEF ColInter ColorInterpolator { key [ 0 .5 1 ] keyValue [ 1 0 0, 0 1 0, 0 0 1 ] } |
The key says at time fraction 0 the colour will be 1 0 0, and at time fraction .0 the colour will be 0 1 0, and at time fraction 1 the colour will be 0 0 1. What this does is changes the colour from red, to green and then to blue. The time fraction comes from the TimeSensor's fraction_changed But that doesn't happen on it's own. It needs something to activate it. This is where the Route's come in.
What happens here is the fraction_changed eventOut gets routed to the ColInter's set_fraction eventIn, which starts the timer off. Then the ColInter's value_changed(which is the keyValue) gets routed to the set_diffuseColor which is part of the material node for the text.
| ## ---- Route Time Change From the Timer To The Interpolator ----
## ROUTE Timer.fraction_changed TO ColInter.set_fraction ## ---- Route The New Value From The Interpolator to the Diffusecolor ---- ## ROUTE ColInter.value_changed TO NewCol.set_diffuseColor |
That's about it for this section. I still have to go into how I updated the scores and handled the collisions, but I will leave this to the next section.
In this section I will explain the PROTOTYPES that I used and also the SCRIPT that controls the whole game.
The first PROTO I will explain is the Scores Prototype. The scores prototype handles the defining of the text that'll be shown in the world. In the PROTO definition I have used a few exposedFields. These fields are used so I can have control over them from within different parts of the program. For example the _Set_Player_Score and the _Set_Computer_Score fields both hold a text value which is used to display the current score in the game. To access the fields as I have shown earlier needs 2 PROTOS. One for the whole definition and one for the exposedFields that you want to access.
| PROTO Scores | ||||
|---|---|---|---|---|
|
Field Type
|
Data Type
|
Object Name
|
Default Value
|
Description
|
|
exposedField |
SFColor |
_TextColor |
1 1 1 |
This fields specifies the color of the text for the title and the scores. |
|
field |
SFVec3f |
_Player1Translation |
-3 2 -4.5 |
This field defines the position of the text for player 1. |
|
field |
SFVec3f |
_Player1ScoreTranslation |
-3.25 1.15 -4.5 |
This defines the position of the score for player 1. |
|
field |
SFVec3f |
_ComputerScoreTranslation |
3.25 1.15 -4.5 |
This defined the position of the computers score. |
|
exposedField |
MFString |
_Set_Player_String |
"PLAYER 1:" |
This field is the text that is displayed on the screen for part of the player 1 score. |
|
exposedField |
MFString |
_Set_Player_Score |
"0" |
This is the current default of the player 1 score. Again it is an exposedField. Notice it is an exposedField, this is due to the fact that I will be changing it's value later on |
|
exposedField |
MFString |
_Set_Computer_String |
"COMPUTER:" |
This is the text for the computers score. |
|
exposedField |
MFString |
_Set_Computer_Score |
"0" |
And again the default score the computer is 0. |
|
field |
SFRotation |
_Rotation |
1 0 0 -1.25 |
This field defines the rotation of the world.. What Idid so that you could see all of the playing field was rotate it on the x axis at |
| PROTO ScoreValues | ||||
|
Field Type
|
Data Type
|
Object Name
|
Default Value
|
Description
|
|
exposedField |
MFString |
_Set_Player_String |
"PLAYER 1:" |
This field is the test that is displayed on the screen for part of the player 1 score. |
|
exposedField |
MFString |
_Set_Player_Score |
"0" |
This is the current default of the player 1 score. Again it is an exposedField. Notice it is an exposedField, this is due to the fact that I will be changing it's value later on |
|
exposedField |
MFString |
_Set_Computer_String |
"COMPUTER:" |
This is the text for the computers score. |
|
exposedField |
MFString |
_Set_Computer_Score |
"0" |
And again the default score the computer is 0. |
The Next PROTO that I will explain is the GamingObject
Prototype. From within this prototype I define the object that
interact with the user and with each other. For example the puck, the
paddle and I also instantiate the Scores from within here as well. Again
this prototype also contains exposedField which have to
be accessed from within the script and other parts of the program, so
therefore I needed to define a second prototype for them.
Below are the prototype definitions.
| PROTO GamingObjects | ||||
|---|---|---|---|---|
|
Field Type
|
Data Type
|
Object Name
|
Default Value
|
Description
|
| exposedField | SFVec3f | _TranslationPaddel | 0 0 0 | This hold the translation of the paddle in the game. When the user moves the PlaneSensor the translation_changed value gets routed to it via the Transform node. |
| exposedField | SFVec3f | _Scale | 1 1 1 | The _scale field only gets used when defining the paddle. I put this here so I could changes the size of the paddle if I wanted to later. |
| field | SFFloat | rad | .25 | This filed holds the radius of both the puck and the paddle. |
| exposedField | SFColor | _PaddelColor | 1 0 0 | This field just holds the colour of the paddle. It's an exposedField which I do not change later. |
| exposedField | SFColor | _PuckColor | 0 0 0 | This field just holds the colour of the puck. It's an exposedField but I don't change it later on in the program. |
| exposedField | SFVec3f | _TranslationPuck | 0 0 0 | This field holds the default position of the puck. This position will be changed using the initialize function later in the script. |
| exposedField | SFVec3f | _VelocityPuck | 0 0 -1 | This field holds the value of the puck's velocity, again it will be changed to the correct position later in the script. |
| exposedField | SFVec3f | _ScalePuck | 1 1 1 | I added this increase I needed to change the size of the puck at later date. |
| Field | SFBool | playing | FALSE | This Boolean value starts whether or not the game is playing or is ready to play. |
|
PROTO Properties |
||||
|
Field Type
|
Data Type
|
Object Name
|
Default Value
|
Description
|
| exposedField | SFVec3f | _TranslationPuck | 0 0 0 | This field holds the default position of the puck. This position will be changed using the initialize function later in the script. |
| exposedField | SFVec3f | _TranslationPaddel | 0 0 0 | This hold the translation of the paddle in the game. When the user moves the PlaneSensor the translation_changed value gets routed to it via the Transform node. |
| exposedField | SFVec3f | _VelocityPuck | 0 0 -1 | This field holds the value of the puck's velocity, again it will be changed to the correct position later in the script. |
Now, to access these exposedFields I had to instantiate
them with the following code; As you can see I have called the prototype
and named it properties (with a lowercase p) The reason
why will become clear later.
| DEF properties Properties { _TranslationPuck IS _TranslationPuck _TranslationPaddel IS _TranslationPaddel } |
In this PROTO I also instantiate the Scores with the following piece of code. Notice as well I have defined then instance of the score with the name theScores.
| Transform { children [ ## ---- Display The Scores, By DEF'ing the Scores ---- ## ## ---- This Allows Me To Reference Them Later To ---- ## ## ---- So I Can Change The Number Of The Score. ---- ## DEF theScores Scores { } ] } |
The following section of code will be the script, which controls the world.
| Control Script | ||||
|---|---|---|---|---|
|
Field Type
|
Data Type
|
Object Name
|
Default Value
|
Description
|
| field | SFNode | properties | USE properties | This USE statement assigns the node properties from out side the script to a field of type SFNode call properties inside the script. Now, if I need to access the properties fields which is outside the script, all I need to do to access them is with a (.). The (.) allows me to access the fields via the properties node which is inside the script, for example properties._TranslationPuck[0] = 2 sets the x coordinate of the puck translation to 2. I would not have been able to do this if it wasn't for the 2nd prototype (Properties). |
| field | SFNode | thescores | USE theScores | Again this is the same as above. But this time I am assigning the score node to the script's SFNode. |
| Field | SFBool | playing | FALSE | This field hold a value of either TRUE or FALSE, these values are checked in the script to see whether or not the game is playing. |
| Field | SFInt32 | playerScore | 0 | This field holds the score for player 1, later on in the script it is checked to see whether not not the maximum number of goals has been reached. |
| Field | SFInt32 | computerScore | 0 | This is the computers score counter, which is also checked inside the script. |
| eventIn | SFBool | StartGame | n/a | The StartGame is an eventIn which means that it is a function. This function sets the playing field to either TRUE or FALSE. |
| eventIn | SFFloat | time_fraction | n/a | This function is in control of the movement of the Puck and also the collision detection of the puck with the walls and the paddle. |
| eventIn | SFBool | upateScores | n/a | This function updates the scores. It gets called with either a TRUE or a FALSE value. The TRUE means that the player has scored and if it is FALSE then the computer has scored. Also in this function I have to create a MFSting node on the fly to update the scores for either the player or the computer. |
| eventIn | SFBool | resetScores | n/a | This function gets called when either the player or the computer have scored the maximum. The function creates a new MFSting with the value of 0 in for both the computer and the player. |
| Functions | ||||
function StartGame(value, ts) { if (playing) return; // Otherwise You Are Not Playing. playing = TRUE; } |
The StartGame function set the playing flag to either TRUE or FALSE. If it is the first time that the function hase been called then the default value it FALSE therefore the function will set it to TRUE. |
|
function resetScores (value, Ts) { |
The resetScores function when it
is called from the time_fraction function resets
the scores for the player and the computer back to zero. It does
this by creating a new MFSting node and replacing it with the old
one. The new MFString tells the browser to create
a new node of type MFString. Then when it does that I can pass it
a value to take as it's argument, i.e. the new score to display.
I could have put |
| Function updateScores (value, Ts) { if(value == TRUE) { if (playerScore == 10) { resetScores(); playing = FALSE; } else { playerScore += 1; thescores._Set_Player_Score = new MFString(''+playerScore); } } else { if (computerScore == 10) { resetScores(); playing = FALSE; } else { computerScore += 1; thescores._Set_Computer_Score = new MFString(''+computerScore); } } } |
This function updates the scores for the player and the computer. The current score is kept in the filed playerScore and computerScore which were defined at the top of the script. If the scores for either the player or the computer are 10 then the scores are reset and the game is over. Otherwise the score is incremented by 1 and then the new score is the displayed to the user, with the new statement. |
time_fraction (See Source Code) |
It also detects to see if the puck has collided
with anything, for example the paddle or the wall. It does 2 check
on the collision with the wall. The puck could just hit the wall,
if thats true then the velocity is negated and set back the way
it came. But, if the puck hit the goal area then the puck should
look like it goes into the field. And is reset in the middle of
the field. |
|
|
The initialize function is called as soon as the world is loaded, therefore it can set the values for the object that we need to position before we can play the game. The position of the puck is placed in the middle of the playing field, the velocity is set to .1 in the x axis and a random number for the z axis. I used the random number so every time you pressed the paddle to start playing you didn't know where the puck would go. The playing field is set to FALSE, because the game hasn't;t started yet. |
The only other PROTO's I used were one for the playing field and one for the title
| PROTO Title | ||||
|---|---|---|---|---|
| Field Type | Data Type | Object Name | Default Value | Description |
| exposedField | SFColor | _TextColor | 1 1 1 | This field holds the colour of the title The default vale is white. |
| Field | SFVec3f | _TitleTranslation | 0 3 -4.5 | This field holds the position of the text on the screen |
| field | SFRotation | _TitleRotation | 1 0 0 -1.25 | This field holds the rotation at which I rotated the title at. |
The title also changes colour while the game is playing the same method is used as in the scores prototype.
| PROTO Field | ||||
|---|---|---|---|---|
| Field Type | Data Type | Object Name | Default Value | Description |
| field | SFVec3f | _Blocksize | 6 .25 .25 | The _Blocksize field hold the dimensions of the blocks that make up the playing field. With this one block I defined whith DEF and USE to make a rectangle playing field. |
| Field | SFVec3f | _Scale | 1 1 1 | This field is here in case I wanted to change the scale of the field. |
| exposedField | SFColor | _SideColor | 1 1 1 | This field holds the colour I wanted the sides of the field. This field is then used in the material node for the diffuseColor. |
| exposedField | SFColor | _FloorColor | .2 .6 .5 | And again I have a field that defines the color of the ground of the floor. |
The last piece of code to talk about is the main part. This part calls t above prototypes so they can all start to interact with each other.
| PROTO Field | ||||
|---|---|---|---|---|
Billboard { children [ ## ---- Turn Off Cosmo's Control Bar. I Want No User Interaction Here NavigationInfo { type "NONE" } ## ---- Define The ViewPoint On Entry ---- ## Viewpoint { position 0 8 1.75 orientation 1 0 0 -.99 description "Entry" } ## ---- Draw The All the Text On The Screen ---- ## Title { } ## ---- Draw The Field -- ## theField { _Scale 1 1 1 _SideColor 0 0 1 _FloorColor 1 1 1 } ## ---- Draw The Puck And The Paddels To Play With ---- ## GamingObject { _TranslationPaddel 0 0 -.5 _Scale 1 .5 1 _PaddelColor 0 0 0 _TranslationPuck 0 0 -3 _PuckColor 1 0 0 } ] } |
The NavigationInfo Node tells COSMO to turn off the control bar, this stops the user from moving around. The different types for the NavigationInfo node are "WALK" which allows the user to walk around, pan from left to right and to view up and down. "ANY" this allows the user to do the same as WALK and to also fly in the y axis, zoom in on an object and examine it(rotate around the object) The Viewpoint is next and sets up the scene view from the position 0 8 1.75 and looking down on the field with a orientation of -.99. Next, I instantiate the playing field, with the scale, the colour of the side walls and the colour of the floor. Then, I instantiate the GaminObject. I set the position of the paddle, the puck and the colour of both. And that's it. All of the rest is performed by the prototypes. |
|||
Due to the lack of time from revision and other projects that I had to
do I would like to either make the world a propur multi-user environment
or make a second paddle for the computer which would either move from
left to right or if I could workout how to make the computer move the
paddle when the ball was getting close to it, I would do that. I would
also like to have linked some Java code to it, so I could have changed
the colour of the object from would side the world or changed the angle
at which I played the game.
I think over all I have made a game that will be used on the web by many people just looking for something to do. I can say that I have learnt quite a few new things from the language that I didn't know before.
by
Jon-Paul Mulholland
